Client Registration and Data Transmission
 Getting Started
Section titled “ Getting Started”This guide helps Nexus engineers and admins interact with the platform via clients. We assume you have a running Nexus instance, following the deployment steps covered earlier.
All client interaction with Nexus is secured via mutual TLS (mTLS). During the deployment of Nexus, all required cryptographic materials were created, and the platform is ready to use.
To interact with the Nexus platform, every client follows a standardized four-stage lifecycle. This sequence ensures that all data transmissions are secure, authenticated, and authorized.

-
Registration The client establishes its identity within the system. During this phase, necessary credentials and metadata are provisioned so the platform recognizes the client as a valid participant.
-
Authentication The client proves its identity to the platform. This typically involves a handshake or token exchange (e.g., using certificates or NKeys) to verify that the client is who they claim to be.
-
Authorization Once authenticated, the platform evaluates the client’s permissions. This step defines which resources the client is allowed to access and which actions (scopes) it can perform.
-
Data Transmission With identity verified and permissions granted, the secure exchange of payload data begins. This is the operational phase where the actual business logic or telemetry flow occurs.
Sample Clients
Section titled “Sample Clients”We provide two ready-to-use clients: a Go Client and a Python Client. Both clients follow the communication flow described above and demonstrate how to interact with the Nexus platform effectively.
These clients are designed for simplicity and can be executed via a single main script. Consequently, you will only need minimal prerequisites to run these scripts on your local machine.
Prerequisites and Setup
Section titled “Prerequisites and Setup”- Go (1.21+): Required to build and run the Go vehicle client via make.
- Python 3.13+: The recommended version for the Python client.
- uv: The primary tool for managing Python dependencies and running the client script.
- Protobuf Compiler (protoc): The Protobuf compiler must be installed for data transmission.
- GCloud CLI: Essential for retrieving TLS certificates from the Google Cloud Secret Manager
Running the Go Client
Section titled “Running the Go Client”The Go client is designed to be built and executed using a Makefile. This automates the code generation from Protobuf files, the retrieval of necessary TLS certificates, and the final execution of the binary.
To start the Go vehicle client, navigate to the client directory and execute the all target:
# Navigate to the Go client directorycd sample-clients/vehicle-client/
# Build and run the clientmake all
When you run the command, you should see a sequence of logs detailing the build process, certificate retrieval, and the multi-step registration flow:
go mod downloadgo mod verifyall modules verifiedGenerating protobuf code from ../../proto/telemetry.proto...protoc --proto_path=../../proto --go_out=telemetry --go_opt=paths=source_relative telemetry.protogo build -v -o vehicle-client .mkdir -p certificatesgcloud secrets versions access latest --secret="REGISTRATION_SERVER_TLS_CERT" > certificates/REGISTRATION_SERVER_TLS_CERT.pemgcloud secrets versions access latest --secret="KEYCLOAK_TLS_CRT" > certificates/KEYCLOAK_TLS_CRT.pem./run-vehicle-client.sh==========================================Check for environment file==========================================Found environment file at ../../iac/bootstrapping/.bootstrap_env.........1. Generating private key...2. Creating certificate signing request...3. Signing certificate with GCP CAS Factory CA...4. Downloading Factory CA certificate...5. Creating certificate chain...
✓ Certificate generation complete!.........2026/01/15 14:07:01 Starting vehicle client for VIN: VEHICLE0012026/01/15 14:07:01 Telemetry interval: 5 seconds2026/01/15 14:07:01 Step 1: Generating operational key pair...2026/01/15 14:07:01 Step 2: Creating Certificate Signing Request (CSR)...2026/01/15 14:07:01 Step 3: Loading factory-issued certificate for mTLS...2026/01/15 14:07:01 Step 4: Sending CSR to registration server at https://registration.sdv-dae.net:8080...2026/01/15 14:07:01   Server requested client certificate2026/01/15 14:07:01 Step 5: Parsing operational certificate...2026/01/15 14:07:01   Keycloak URL: https://keycloak.sdv-dae.net:84432026/01/15 14:07:01   NATS URL: nats://nats.sdv-dae.net:42222026/01/15 14:07:01   Certificate valid until: 2027-01-15 13:07:01 +0000 UTC2026/01/15 14:07:01   Saved operational certificate to operational-cert.pem2026/01/15 14:07:01   Saved operational key to operational-key.pem2026/01/15 14:07:01 ✓ Successfully registered and obtained operational certificate2026/01/15 14:07:01 Step 1: Configuring mTLS with operational certificate...2026/01/15 14:07:01 Step 2: Requesting JWT from Keycloak at https://keycloak.sdv-dae.net:8443...2026/01/15 14:07:01   Keycloak requested client certificate2026/01/15 14:07:02   Token expires in: 300 seconds2026/01/15 14:07:02 ✓ Successfully authenticated with Keycloak and obtained JWT2026/01/15 14:07:02 Connecting to NATS at nats://nats.sdv-dae.net:4222 with JWT...2026/01/15 14:07:02   Connected to NATS successfully2026/01/15 14:07:03 ✓ Successfully connected to NATS2026/01/15 14:07:03 Starting continuous telemetry publishing...2026/01/15 14:07:03 Step 1: Configuring mTLS with operational certificate...2026/01/15 14:07:03 Step 2: Requesting JWT from Keycloak at https://keycloak.sdv-dae.net:8443...2026/01/15 14:07:03   Keycloak requested client certificate2026/01/15 14:07:03   Token expires in: 300 seconds2026/01/15 14:07:03 JWT refreshed, expires at: 2026-01-15T14:22:03+01:00...
Once the client successfully registers and connects, it transitions into the operational phase, where you will see the continuous data transmission logs:
...2026/01/15 14:07:08 [1] Published protobuf to telemetry.VEHICLE001.battery: SoC=85.4%, Voltage=12.67V, Current=44.58A, Temp=25.6°C2026/01/15 14:07:13 [2] Published protobuf to telemetry.VEHICLE001.battery: SoC=85.3%, Voltage=12.72V, Current=45.71A, Temp=25.9°C2026/01/15 14:07:18 [3] Published protobuf to telemetry.VEHICLE001.battery: SoC=85.3%, Voltage=12.78V, Current=46.77A, Temp=25.6°C2026/01/15 14:07:23 [4] Published protobuf to telemetry.VEHICLE001.battery: SoC=85.2%, Voltage=12.72V, Current=45.90A, Temp=25.6°C2026/01/15 14:07:28 [5] Published protobuf to telemetry.VEHICLE001.battery: SoC=85.2%, Voltage=12.72V, Current=46.41A, Temp=25.6°C2026/01/15 14:07:33 [6] Published protobuf to telemetry.VEHICLE001.battery: SoC=85.1%, Voltage=12.67V, Current=48.16A, Temp=25.2°C2026/01/15 14:07:38 [7] Published protobuf to telemetry.VEHICLE001.battery: SoC=85.1%, Voltage=12.73V, Current=46.66A, Temp=25.0°C2026/01/15 14:07:43 [8] Published protobuf to telemetry.VEHICLE001.battery: SoC=85.0%, Voltage=12.76V, Current=45.38A, Temp=25.1°C2026/01/15 14:07:48 [9] Published protobuf to telemetry.VEHICLE001.battery: SoC=85.0%, Voltage=12.73V, Current=44.09A, Temp=24.9°C...Once the client successfully registers and connects, it transitions into the operational phase, where you will see the continuous data transmission logs:
Running the Python Client
Section titled “Running the Python Client”The Python client is executed via a dedicated shell script that loads environment variables from the bootstrapping configuration and prepares the identity verification (PKI). Execution is handled efficiently using uv.
To start the Python vehicle client, navigate to the directory and run the launcher script:
# Navigate to the Python client directorycd sample-clients/python/
# Execute the script with the desired PKI strategymake all
The terminal output is similar to that of the Go Client. A successful run will conclude with the following logs in your shell:
...Successfully registered and received operational certificate. Keycloak URL: https://... NATS URL: nats://...Step 1: Configuring mTLS with operational certificate...Step 2: Requesting JWT from Keycloak at https://...Successfully retrieved access token. Token expires in: 300 secondsConnecting to NATS at nats://...Connected. Sending 7 telemetry messages...Telemetry published (1/7).Telemetry published (2/7).Telemetry published (3/7).Telemetry published (4/7).Telemetry published (5/7).Telemetry published (6/7).Telemetry published (7/7).Successfully sent test telemetry data.Now that both clients are successfully sending data to Nexus, you can verify the data ingestion in the platform.
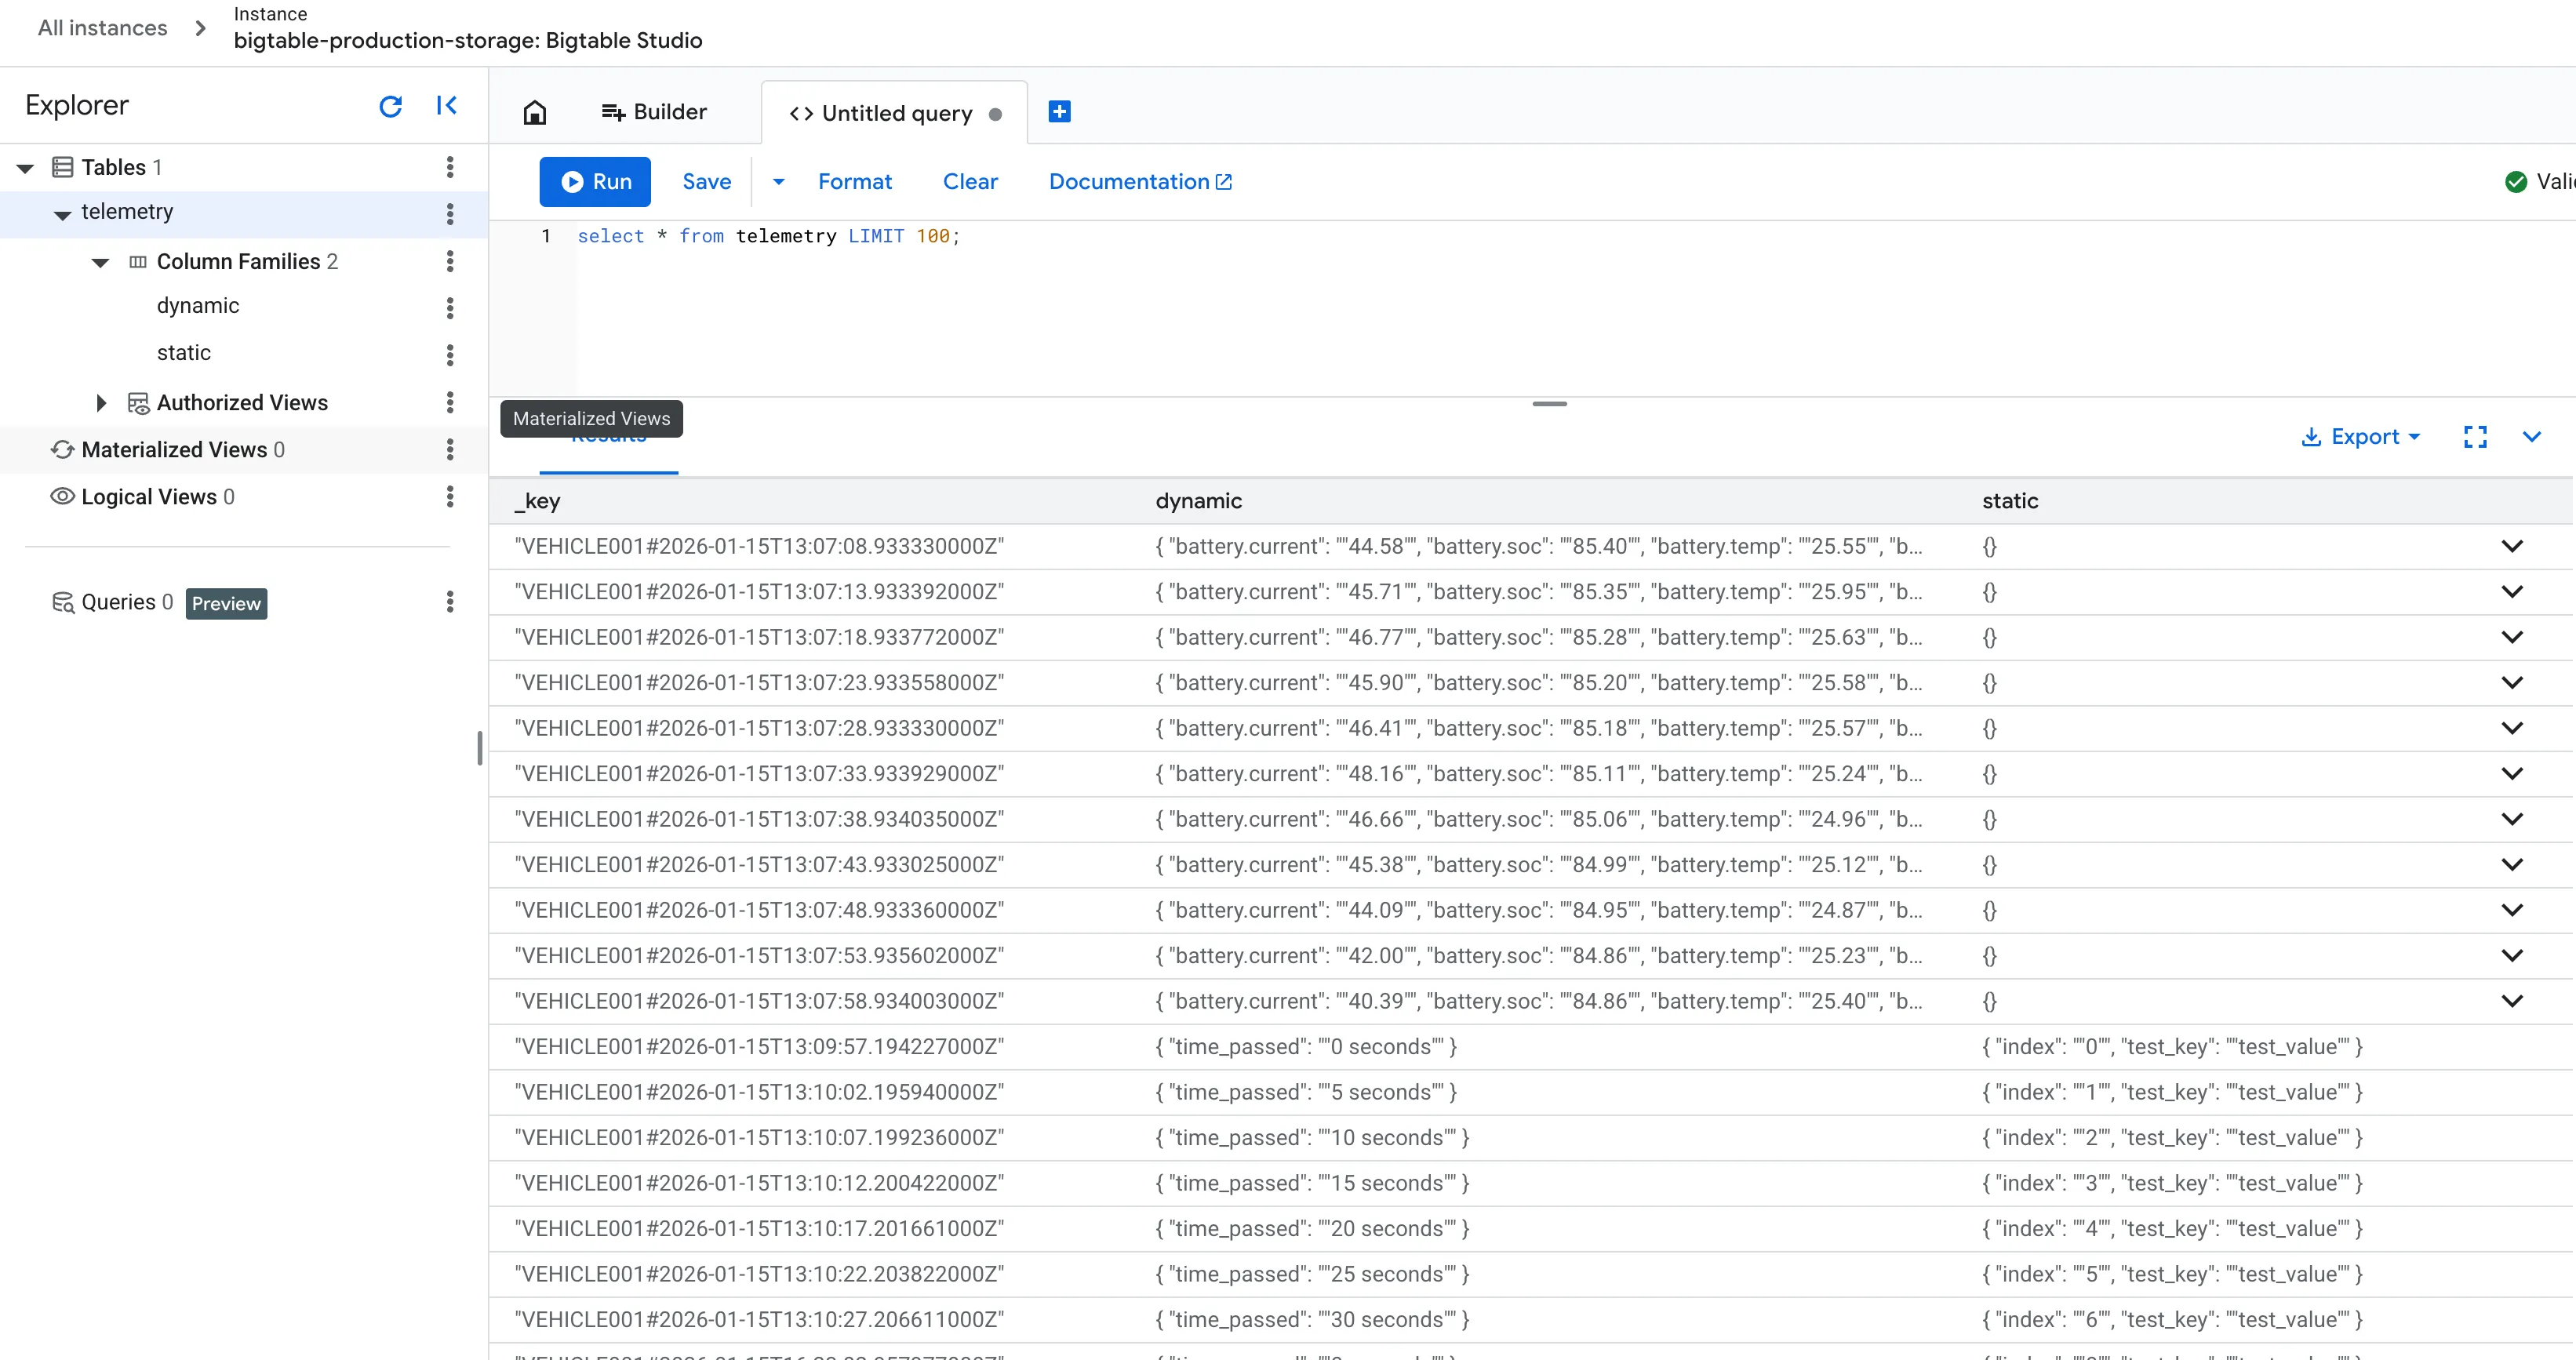
Verifying Data Ingestion in BigTable
Section titled “Verifying Data Ingestion in BigTable”After running the sample clients, you can verify that the telemetry data is being correctly ingested into your database via the Google Cloud Console.
- Log in to the Google Cloud Console and navigate to your Nexus project.
- Open BigTable > Instances and select your instance (e.g.,
bigtable-production-storage). - Click on BigTable Studio in the left-hand navigation menu.
- Select the
telemetrytable. You will notice the table is structured into two distinct column families:static: Stores persistent vehicle metadata.dynamic: Stores time-series telemetry data like battery SoC, voltage, and temperature.
To view the transmitted data, execute the following query in the SQL editor:
SELECT * FROM telemetry LIMIT 100;Data Characteristics
Section titled “Data Characteristics”The sample clients are programmed to demonstrate different aspects of the Nexus data schema:
| Client | Primary Focus | Column Families Used | Purpose |
|---|---|---|---|
| Go Client | Real-time Stream | dynamic | Simulates a continuous telemetry flow (e.g., battery metrics). |
| Python Client | Identity & State | static & dynamic | Demonstrates identity state and metadata handling. |
See this screenshot as example:
Closing Considerations
Section titled “Closing Considerations”Nexus was developed to empower engineers to rapidly build Proof of Concepts (PoCs) for next-generation connected vehicle applications on a platform that mirrors production-grade environments as closely as possible. Despite its lightweight footprint, Nexus delivers the scalability and innovation of a cloud-native platform, underpinned by industry-standard security concepts like PKI and mTLS.
Future Outlook
Section titled “Future Outlook”We are only at the beginning of the Nexus journey. The two sample clients are designed to evolve into distinct roles within the ecosystem:
- Python Client: Serving as the blueprint for AAOS (Android Automotive OS) integration. This pattern is intended to be transitioned into Android Automotive system services.
- Go Client: Slated to evolve into the official Nexus CLI, providing a powerful command-line interface for platform management in future releases.